Drawing the Head And Hands by Andrew Loomis
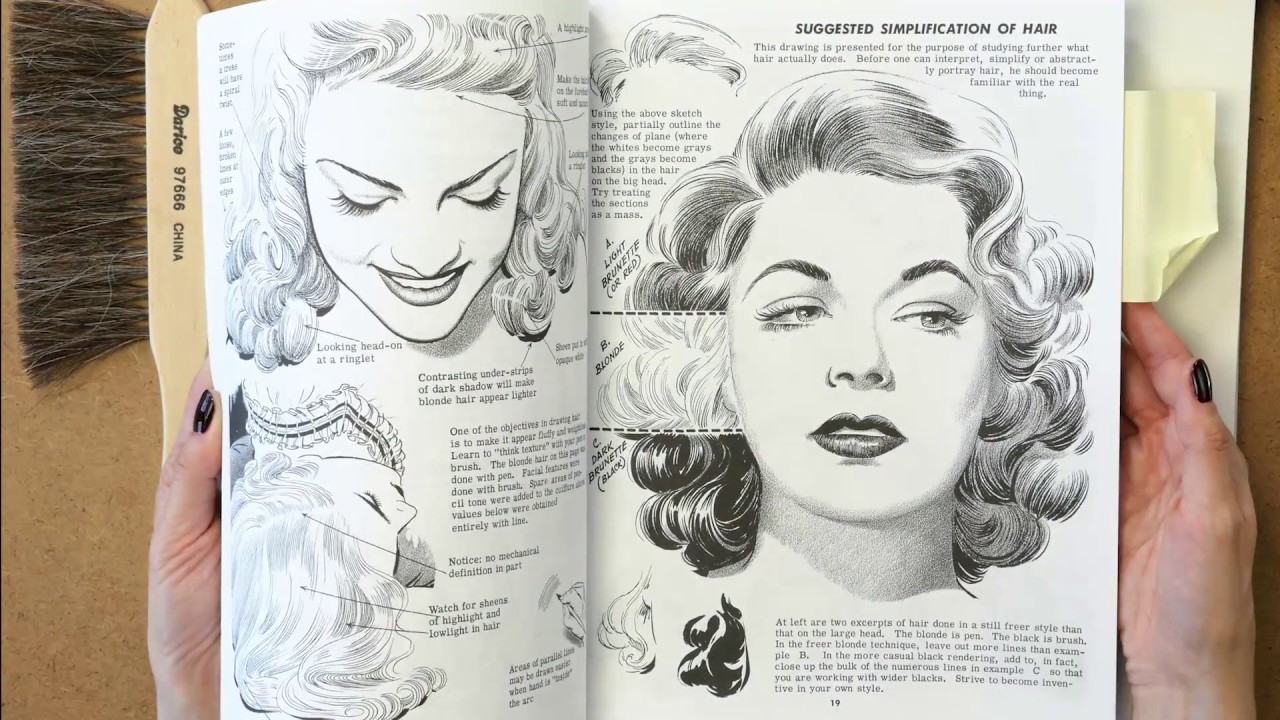
In his book, Drawing the Head and Hands, Andrew Loomis starts by teaching the reader how to draw a head from various angles. He then moves on to drawing hands, again from different angles. Loomis uses simple geometric shapes to demonstrate how to break down complex forms into manageable pieces.
By the end of the book, the reader will have a better understanding of how to draw both heads and hands.
If you’re anything like me, then you love to draw. And, if you’re anything like me, then you’re always looking for ways to improve your skills. One of the best ways to do that is by studying from the masters – and Andrew Loomis is definitely a master when it comes to drawing the human head and hands.
In his book, Drawing the Head and Hands, Loomis breaks down exactly how to draw these two difficult parts of the human body in a clear and concise manner. He starts with the basics – such as proportions and skeletal structure – before moving on to more complex concepts, such as foreshortening and gesture. Throughout the book, Loomis provides readers with plenty of helpful illustrations and step-by-step instructions that make it easy to follow along.
Whether you’re a beginner or a seasoned artist, Drawing the Head and Hands is a great resource that will help you take your skills to the next level. So grab a pencil and get started!

Credit: boingboing.net
How Do You Draw a Loomis Head?
In order to draw a Loomis head, you will need to start with a basic oval shape. Next, you will need to divide the oval into four equal sections using vertical and horizontal lines. Once you have divided the oval, you will then need to draw two diagonal lines that intersect in the center of the oval.
These diagonal lines will be used to help place the features of the face later on.
After you have drawn the basic guidelines for the face, you can then begin to add in the features. Start by drawing two small circles for the eyes, making sure that they are evenly spaced within their respective quadrants.
Then, draw a slightly larger circle for the nose and another larger circle for the mouth. The final step is to add in some details such as eyelashes, eyebrows, and teeth. And there you have it!
A completed Loomis head drawing!
How Do You Draw the Head from Any Angle Loomis?
When drawing the head from any angle, Loomis advises using a three-quarter view. This means that the front of the face is visible, as well as one side. To achieve this, first imagine a horizontal line passing through the center of the face.
Then, visualize a vertical line passing through the nose. Where these two lines intersect is where you will start drawing the head.
Next, draw an oval that encompasses the entire head.
This will be your guide for placing features later on. Once you have the oval in place, lightly sketch in guidelines for where the eyes, nose, and mouth should go. Remember to take into account perspective when placing these features – they will appear smaller on one side of the oval than on the other.
With your guidelines in place, begin fleshing out each feature. For example, draw almond-shaped eyes or a small nose and mouth. Add details like eyelashes or hairline indentations as desired.
How Do You Draw a Head Step by Step?
Assuming you would like a step by step guide on how to draw a head:
1. Start by drawing an oval shape for the head. This doesn’t have to be perfect, just get a general idea of the size and shape of the head.
2. Next, add two lines coming down from the top of the oval. These will be used to help place the eyes later on.
3. Now draw a horizontal line across the middle of the oval.
This will be used to determine where to place the nose and mouth later.
4. Add two small circles near the top of the oval for the eyes and then add a small upside down triangle for the nose in between them. Just below this, add a curved line for the mouth.
5 Finally, add some hair on top of the head and ears on either side. Erase any remaining pencil lines that you don’t need anymore and you’re done!
What is the Reilly Method?
The Reilly method is a unique approach to chiropractic care that was developed by Dr. James Reilly. It is based on the premise that the human body has an innate ability to heal itself, and that chiropractic care can help facilitate this process.
The Reilly method uses a combination of spinal manipulations, soft tissue work, and exercises to address each individual’s needs.
This approach is designed to not only relieve pain but also restore function and improve overall wellbeing.
One of the things that sets the Reilly method apart from other chiropractic approaches is its focus on whole-body health. Rather than simply treating symptoms, the Reilly method seeks to find and correct underlying imbalances that may be contributing to ill health.
This holistic approach often leads to long-term results and improved quality of life for patients.
Drawing the Head and Hands by Andrew Loomis
Drawing the Head And Hands Pdf Free Download
If you’re an artist, then you know how important it is to be able to draw the human head and hands. After all, these are two of the most expressive parts of the body. And while they may seem like they’re easy to draw, they can actually be quite challenging.
That’s why we’ve put together this comprehensive guide on drawing the head and hands. We’ll walk you through each step of the process, from start to finish, so that you can create realistic and expressive drawings that capture your subjects perfectly.
We’ll also provide plenty of tips and tricks along the way that will help you master this essential skill.
So whether you’re a beginner or an experienced artist, this guide is sure to help you improve your drawings.
So let’s get started!
Conclusion
In his classic 1941 book, Drawing the Head and Hands, artist Andrew Loomis offers a wealth of advice on how to draw these two essential features of the human form. He begins by explaining the importance of drawing from life rather than from photographs, as photos can distort reality. He then goes on to provide detailed instructions on how to construct the head and hands using simple geometric shapes.
Loomis also provides helpful tips on foreshortening (the apparent distortion of an object when viewed from an angle) and perspective. Throughout the book, he includes numerous examples of his own work to illustrate his points.